
Upstate Peloton
Cycling Club
Tubeless Tires
Page created 7/1/2025 by CG; updated 8/5/2025
 In the mountain biking world, tubeless tires usually make sense. In the road cycling world, it's not always as obvious.
Even I was on the fence for a while, but I eventually switched. This page is based on my research and experiences.
In the mountain biking world, tubeless tires usually make sense. In the road cycling world, it's not always as obvious.
Even I was on the fence for a while, but I eventually switched. This page is based on my research and experiences.
All of the information on this page is available elsewhere on the internet, but I've found that the information is scattered all over the place and/or leave something important out, or just is't organized well.
Benefits of Tubeless
(compared to tubes)- Resistance to flats. The sealant inside the tires generally protects you from traditional pinch flats and small punctures. It does not protect you from large punctures or slices.
- Faster to repair larger punctures. If you have a puncture so large your sealant doesn't repair it, you can use a "bacon strip" to permanently repair the puncture while the wheel is still mounted.
- Lower Tire Pressure since you don't have to worry about pinch flats, which means:
- Lower rolling resistance, leading to improved speed if you're strong enough to notice.
- Softer rides, basically reducing "road buzz."
- Better Grip on loose terrain.
- It's lighter. A tubeless tire with the proper amount of sealant is usually lighter than a tire and butyl tube.
Disadvantages of Tubeless
(compared to tubes)- More maintenance time. Switching to tubeless requires time to switch, and then maintenance twice yearly.
Because of the maintenance frequency involved, I'd recommend doing the work yourself.
Planned maintenance is generally preferred over unplanned flats. Once you get used to the maintenance, it's fairly quick & easy. - Requires Tubeless Ready (TLR) wheels. If unsure whether your wheels are TLR, ask your local bike shop.
- It's more expensive. Tubeless tires are a few dollars more expensive than standard tires, and require you to purchase sealant and other accessories.
- Flats can still happen and you need to be prepared. This means carrying a tubeless repair kit on rides in addition to all of same supplies you need for tubes. Some flats are so bad that you need a tube.
- It's messy. Adding sealant can be messy. Punctures and slices will spew sealant out of the tire. Further, If you need to install a tube mid-ride, it's even messier. You'll want to clean any sealant off of surfaces/clothing immediately after your ride.
- Tubeless tires are tighter on the rim on purpose; Mounting/removing is slightly harder.
- Loses air faster, though usually not fast enough to worry about it mid-ride. If you're competing in a 10 hour ride, you may want to factor it in. If you're riding a multi-day adventure, you'd want a pump anyway.
- Harder to swap tires for different types of rides. If you have a gravel bike, you may want one tire tread for a ride that will be mostly mud (i.e. CX), one set for dry gravel, one set for tarmac, etc. You can suck up some sealant with an injector tool and put in the next tire. All this may loosen the tire bead over time. Alternatively you can have multiple wheelsets for different tires, but wheels are expensive and swapping the cassette/rotors between wheelsets might take as long as swapping the tires/sealant. Plus, multiple wheelsets means more maintenance if they're also running tubeless.
Real world use cases for tubeless
In my opinion, these are the scenarios you would seriously consider tubeless:- Frequent flats. If you get frequent punctures or pinch flats in tubes while riding (due to your weight or riding surfaces) and you have tried higher air pressures.
- Offroad/Gravel riding, where you're more prone to flats and/or you want as much grip and/or cushioning from softer tires.
- You need maximum marginal gains, i.e. you're competing.
If you're not competing and don't get a lot of flats, you may be better off with tubes.
Materials Required
As an Amazon Associate I earn from qualifying purchases. Links are provided to demonstrate available products. Be sure to verify that products will fit your bike/wheel.- Tubeless Ready (TLR) tires. (GP5000 Road Tires or WTB Resolute Gravel Tires)
- Tubeless compatible wheels.
- Either the original tubeless rim strip that came with the wheel (if applicable), or a roll of Tubeless Rim Tape.
- Sealant of your choice. (Stans Sealant)
- Tubeless valve stem that's compatible with your wheels.
- Spare valve cores and core removal tool.
- Floor Pump. You MAY need: Air compressor OR Air Canister OR High volume pump if you have problems.
- OPTIONAL: Sealant injector (Park Tool Sealant Injector) & pipe cleaners (if compatible with your sealant brand)
- 91% isopropyl alcohol from a local store.
- Tubeless tire repair kit. bacon strips tackle kit are simple, though some may prefer Stans Darts or Dynaplug.
- All of the same roadside flat tire supplies you should already be carrying (proper sized tube, boot, pump or inflator, levers)
Process - Initial
For each wheel:
- Tubeless sealant can be messy. Choose a location to work that is easy to clean up liquid messes. i.e. outdoors.
- Confirm the original tubeless rim strip is on the wheel. If not, clean the rim with isopropyl alcohol and then install the original strip or new tape.
- Cut a clean hole through the rim tape and install the new valve stem. Finger tight is sufficient.
- Mount half of the tire on the rim, following any rotational direction indicators.
- Starting opposite the valve, start mounting the other side of the tire to about halfway.
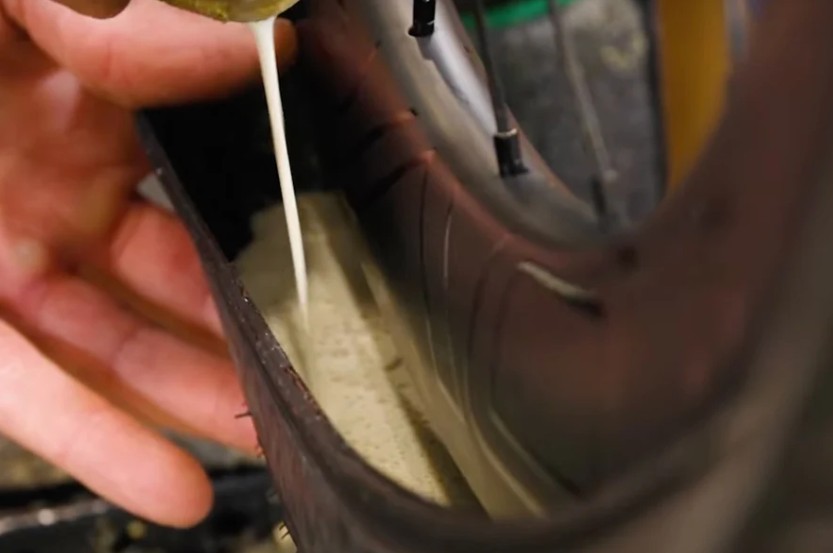
- Shake the bottle of sealant & measure the proper amount for your tire size, per the sealant manufacturer recommendations.
- Pour sealant into the tire. Make note of about how deep the sealant is for later in the season.
- While keeping the wheel upright, slowly rotate so the unmounted part of the tire is on top. Mount the remainder of the tire, finishing at the valve. I've used a little bit of sealant to lubricate the tire for the last section of tire mounting. Soapy water would help too.
- Using a standard floor pump, pump up the tire quickly until the bead seats on the rim. If the tire bead is tight enough, it will inflate.
If you have difficulty seating the tire bead, you may want to try one or more of these:
- Try to slide the tire bead out of the rim well.
- loosely wrap a string or strap around the tire to evenly push the tire bead against the rim as much as possible.
- Remove the valve core for maximum airflow.
- Use a charged air cannister (cheapest) OR an air compressor OR high volume floor pump.
- spray/wipe soapy water around the bead to lube/seal.
- If you removed the valve core, re-add it.
- Pump up the tire not to exceed the maximum pressure on the tire's sidewall. The tire will make a popping noise as it seats onto the rim wall.
- Ensure the bead seat line is visible and end evenly spaced around the rim on both sides.
- Wipe any sealant off the wheel with a wet rag.
- Spin & shake the wheel to ensure the sealant makes it to all inside surfaces of the tire.
![]() Park Tool - Tubeless Troubleshooting
Park Tool - Tubeless Troubleshooting
Process - Maintenance
Every 2-3 months mid-season and as-needed
Depending on how much you ride, where you store your bike, the sealant you use, etc, you may want to check the sealant level every 2-3 months. OR, if you noticed a significant loss of air during a ride, you may have lost some sealant and need to top if off. In either case, here are the steps:- Tubeless sealant can be messy. Choose a location to work that is easy to clean up liquid messes. i.e. outdoors.
- Release air pressure from the tire.
- Remove the valve core
- Insert a dull/thin item to see how much sealant is in the tire. A zip tie or a pipe cleaner will work.
- Use a sealant injector to top off the sealant level in the tire. Use the same brand of sealant that is already in the tire.
Note: if your sealant or valve stem manufacturer does not recommend injecting through the valve, you'll want to pop the bead and re-add like you did with the initial setup. - Use a pipe cleaner or something similar to clean the sealant from the inside of the valve stem.
- Inspect the valve core. Replace or re-install.
- Re-inflate the tire.
- Wipe any sealant off the wheel with a wet rag.
- Clean the sealant injector.
Annual Maintenance
Annual assumes you don't ride in the cold winter. If you ride year-round, you may need to do this more often:- Tubeless sealant can be messy. Choose a location to work that is easy to clean up liquid messes. i.e. outdoors.
- Release air pressure in the tire.
- Starting at the valve, remove the tire from the rim.
- Remove old tire sealant from the tire & rim, including all of the dried sealant. Pay close attention to the tire bead. Use isopropyl alcohol on the rim if necessary.
- Inspect valve stem/core. Clean the inside of the stem and replace core if it's too gummy.
Note: After removing the valve core, you can poke a thin screwdriver through the valve stem to unclog it. - Re-add sealant using the "initial" instructions above.
Roadside Repair
There are different types of common issues. These are:- Burping - This is a very brief and sudden loss of air when the tire bead momentarily unseats from the rim, typically due to lateral forces and/or low tire pressure. You may want/need to add more air after a burp.
- Small puncture - the sealant will fill the hole. If it takes a while, you may want to add more air to the tire.
- Large puncture - you need to insert one or more bacon strips or your plug of choice. You may need some of your drink to find the exact spot of the puncture.
- Slice or other bad cut that's too big for bacon strips.
- Remove the wheel from the rim.
- Remove as much sealant as possible.
- Remove the valve stem from the wheel.
- Use a tire boot or spare piece of tire if the issue is bad enough. Even a dollar bill that's been folded a few times.
- Insert a tube; mount the tire; inflate.
- Ride home or continue your ride depending on the level of damage.
- After returning home, permanently repair or replace tire.
Other Notes
- Depending on how many bikes you have with tubeless tires, you may want to consider purchasing a quart of sealant at a time. Depending on the brand and if the bottle is sealed properly, it should last a few years.
- If you get sealant on anything, wash it as soon as possible. If you missed sealant on your bike frame, goo gone can help to dissolve dried sealant.
- Different brands of sealant perform differently. Some are so effective at sealing punctures that they may be more likely to gum up your valve stem/core. Different brands may have different freezing temperatures, lifespans, etc. Although most brands should be biodegradable, but not all are.
- If inflating your tire with compressed CO2, the expanding gas is cold and may temporarily freeze the sealant.
- You do not need to bring extra sealant with you for mid-ride top-offs, unless you're on an unsupported multi-day ride.
- "True Tubeless" tires (if you can find them) don't require any sealant and are much thicker/heavier and not as soft/fast as "Tubeless Ready" (TLR) tires.
- TPU tubes are smaller/lighter than butyl tubes, and it might be an alternative to carrying a spare butyl tube in your saddle bag. However, TPU tubes may be a bit expensive for a one ride use item. I'm also not certain of the shelf life of TPU tubes that have been sitting in my saddle bag in my hot garage for potentially years, how they might react to plugs, and if I should trust them to get me home.
- Besides bacon strips, there are other products out there including Stans Darts and Dynaplug which you may prefer. I've read mixed reviews on Darts,
and I don't like the idea of a brass pointer floating around my rim.
 GCN - Dynaplug
- If marginal gains are your thing, have you looked into Latex tubes?
GCN - tube comparison
More Videos
![]() GCN - Lack of Tubeless maintenance
GCN - Lack of Tubeless maintenance